| tags:raspberry pi openwrt categories:computing
stubbyをつかってDNSを暗号化
プライバシーとセキュリティの向上のため、 DNS通信を覗き見されないように暗号化を行います。
OpenWRTのWifiにはいくつかの方法が記載されています。 まずは一番良さそうなUnboundを使った方法も最初に試してみるも、 Travelmateにはdnsmasqが必要、Nginxのリバースプロキシやadblockが機能しなくなりました。
ということで、dnsmasqとstubbyというアプリを使った方法に切り替え、やり直し。
まずはパッケージのインストールから、
root@OpenWrt:~$ opkg update
root@OpenWrt:~$ opkg install dnsmasq stubby
DNSの暗号化を有効化します。
root@OpenWrt:~$ uci -q delete dhcp.@dnsmasq[0].server
root@OpenWrt:~$ uci get stubby.global.listen_address \
| sed -e "s/\s/\n/g;s/@/#/g" \
| while read -r STUBBY_SERV
do
uci add_list dhcp.@dnsmasq[0].server="${STUBBY_SERV}"
done
root@OpenWrt:~$
# Enforce DNS encryption for LAN clients
root@OpenWrt:~$ uci set dhcp.@dnsmasq[0].noresolv="1"
root@OpenWrt:~$ uci commit dhcp
サービスを再起動、stubbyを起動時に動くように登録します。
root@OpenWrt:~$ /etc/init.d/dnsmasq restart
udhcpc: started, v1.30.1
udhcpc: sending discover
udhcpc: no lease, failing
root@OpenWrt:~$ /etc/init.d/stubby start
root@OpenWrt:~$ /etc/init.d/stubby enable
が、しかし、どうも再起動時に起動しません。。 失敗したかと思いましたよ。。
まぁ、面倒ですが、管理画面のSystem > Startupより
ポチッとスタートボタンを、
もしくは自動スクリプトに追加すればいいのかな。。
TLS化が機能しているかどうかは
https://1.1.1.1/help
より確認できます。
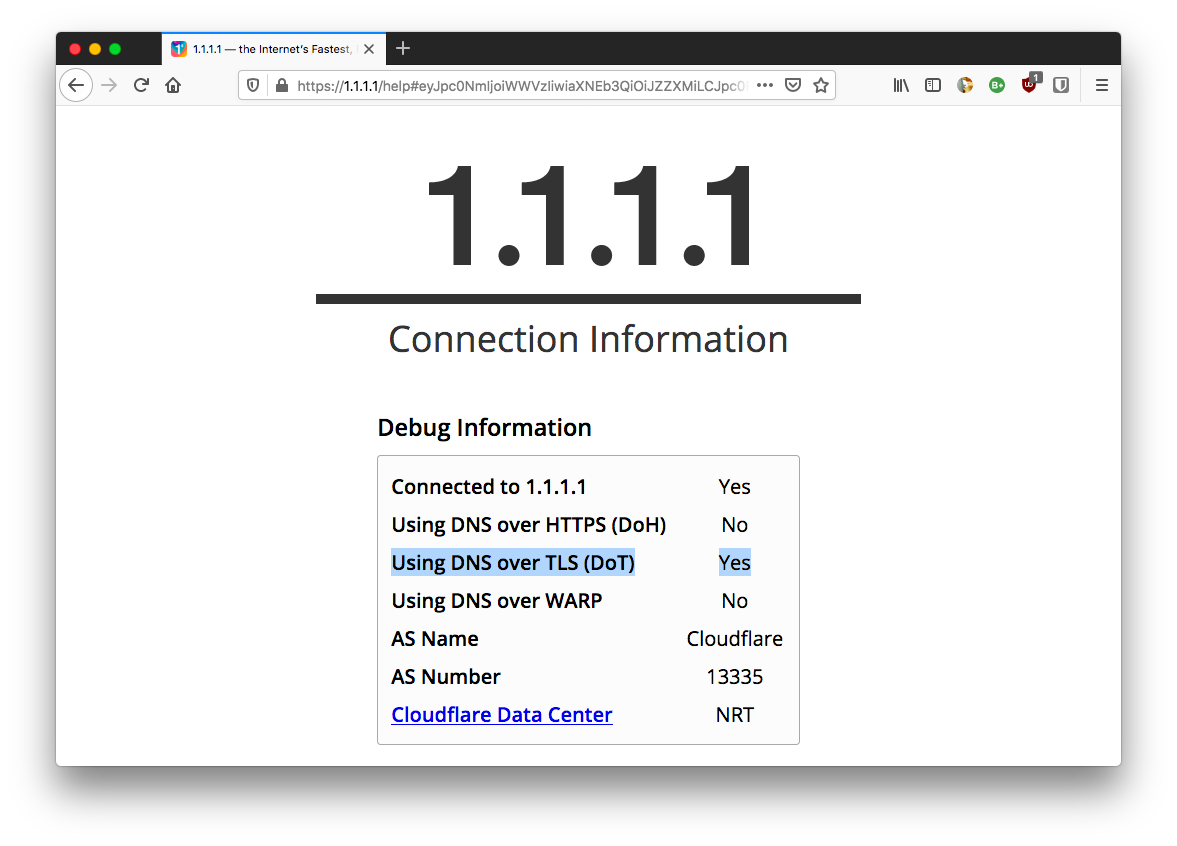
こんな画面が出れば問題なく動作しているということのようです。
- DoT provider: https://en.wikipedia.org/wiki/Public_recursive_name_server
- DNS over TLS with dnsmasq & stubby: https://openwrt.org/docs/guide-user/services/dns/dot_dnsmasq_stubby
- DNS over TLS with Unbound: https://openwrt.org/docs/guide-user/services/dns/dot_unbound
- Unbound Recursive DNS Server with UCI: https://github.com/openwrt/packages/blob/openwrt-19.07/net/unbound/files/README.md
- Public DNS: https://en.wikipedia.org/wiki/Public_recursive_name_server
